Introduction
Do you ever look at your home’s walls and think it needs a fresh, eye-catching coat of paint? If so, you are not alone. Wall house painting is a task that many homeowners ponder on, but often people hesitate due to the perceived complexity or fear of ruining their home’s aesthetic. We, at Earthly Matters Contracting, Inc., believe that painting your home is not just about changing colors – it’s about giving your home a personality while protecting it from the forces of nature. With the right guidance, painting your walls can transform from an intimidating chore to an exciting project.
There’s no denying that repainting your home can have a significant impact on its appeal. Whether it’s a vibrant splash of color or a subtle change in tone, the right paint on your walls can breathe new life into your living spaces. But beyond the aesthetics, good wall paint serves a protective function, shielding your walls from weather damage.
And before your heart starts racing at the thought of climbing ladders and making a mess with paint buckets, hold on! We’re here to guide you through this journey. Armed with the right information, you would be surprised at how methodical and manageable the process of wall house painting can truly become.
Here’s a quick overview of the 5 simple steps to kick start your wall house painting journey:
- Prepare Your Room: This includes removing or covering furniture, inspecting, repairing, and cleaning your walls.
- Prime Your Walls: Essential for an ideal paint job that lasts, priming ensures any patches or stains on your walls get hidden and your paint adheres better.
- Choose the Right Paint and Tools: Yes, finding the perfect color is important, but so is selecting the right type of paint and brushes or rollers.
- Paint Your Walls: Armed with your paint and tools, this is where you bring a new lease of life to your walls.
- Clean Up and Evaluate: Finally, learn to tidy up and sit back and enjoy the transformation.
This process may appear intricate, but with each step diligently followed, the daunting task of wall house painting becomes a joyous journey of enhancing your home’s charm.
Step 1: Preparing Your Room for Painting
Preparation is key when it comes to wall house painting. Taking the time to properly prepare your room will ensure a smoother painting process and a more professional-looking result.
Removing Furniture and Fixtures
Start by moving your furniture out of the room. If this isn’t possible, move them to the center and cover with a protective cloth. Don’t forget to also remove all fixtures, including lights, blinds, HVAC registers, and outlet covers. This will prevent them from getting splattered with paint.
Inspecting and Repairing Wall Imperfections
Once the room is clear, inspect your walls for any imperfections such as cracks, holes, or dents. These imperfections, if not addressed, can mar the finished appearance of your paint job. Use a putty knife and lightweight spackling compound to fill and repair these areas. After applying the spackling, let it dry according to the manufacturer’s instructions. Then, smooth out the repaired areas using 220-grit sandpaper or a sanding sponge to ensure a smooth surface for painting.
Cleaning the Walls
After the repairs are done, it’s time to clean your walls. Use a large cellulose sponge and a solution of water mixed with a few drops of mild dishwashing liquid to remove any dust, dirt, or grease. Finish with a wipe-down using a damp cloth to remove any soap residue. Cleaning the walls is crucial because paint adheres better to a clean surface.
Masking Off Trim, Windows, and Doors with Painter’s Tape
Next, use painter’s tape to mask off areas you don’t want to paint. This includes trim, windows, and doors. Press the tape firmly to prevent paint from seeping underneath. If you’re painting an accent wall, mask off the inside edge of the wall from the rest of the room.
Protecting Floors with Drop Cloths
Finally, protect your floors from paint drips and splatters by covering them with drop cloths. Canvas drop cloths are a great choice because they’re durable, absorbent, and can be reused. Plastic drop cloths are also a good option, especially for larger areas.
By following these steps, you’re setting yourself up for a successful wall house painting project. A little prep work goes a long way in achieving a professional finish.
Step 2: Priming Your Walls
Before you dive into color and texture, lay the groundwork. A crucial part of the wall house painting process is priming your walls.
Importance of Priming
Priming may seem like an unnecessary step, but it’s actually vital for achieving a high-quality finish. It’s the bridge between your wall and the paint, enhancing paint adhesion, and preventing stains and peeling. As we often say at Earthly Matters Contracting, Inc., priming can make a significant difference in the longevity and quality of your paint job.
Choosing the Right Primer
The primer you choose will depend on the condition and color of your walls. If you’re transitioning from a dark color to a lighter one, a primer is crucial. Some primers can even be tinted to match your paint color, providing coverage at a lower cost, and saving you money on paint. Many brands also offer paint and primer in one, which can be a time-saving option.
Applying Primer to the Walls
Now that you’ve chosen your primer, it’s time to apply it to your walls. Start with the corners and edges using a 2-inch angled paintbrush. This process is known as “cutting in.”
Next, fill a paint tray with primer and dip your roller into it. Make sure the roller is evenly coated and roll it up and down your wall, ensuring the section is fully covered. Repeat until your wall is fully primed.
Remember to follow the manufacturer’s drying instructions. This information is usually found on the can and ensures the primer is completely dry before you start painting.
Sanding the Primer for a Smooth Finish
Once the primer is dry, lightly sand any bumps and ridges using fine grit sandpaper. This helps you achieve a smooth, even surface for your paint to adhere to. Wipe the wall clean with a damp towel or sponge and let it dry.
Priming is a vital step in the wall house painting process. It prepares your walls for the paint, ensuring a smooth, long-lasting finish. At Earthly Matters Contracting, Inc., we believe in doing things right, and that includes the all-important step of priming.
Next up, we’ll guide you through choosing the right paint and tools for your project.
Step 3: Choosing the Right Paint and Tools
Now that your walls are primed and ready, it’s time to dive into the exciting part – choosing your paint and gathering the necessary painting tools.
Selecting the Best Paint for Inside House Walls
Selecting the right paint for your walls is a crucial step in the wall house painting process. The paint you choose can make a significant difference in the look and feel of your room.
For the interior walls of your house, we at Earthly Matters Contracting, Inc., recommend using either flat, eggshell, or semigloss paint. Flat paint is excellent for hiding imperfections, but it can be harder to clean. On the other hand, an eggshell finish provides a slight shine and holds up better to cleaning. If you prefer a shinier finish, semigloss paint could be your best bet. It’s ideal for trim and doors due to its attractive contrast and easy cleaning.
As you select your paint, the color you choose can alter the perceived space of the room. Dark colors can make a room appear smaller, while light colors can open up the space. Be sure to test drive your color by painting a small portion of your wall and observe the color in different lights throughout the day. This way, you can make sure you’ve chosen the perfect color for your space.
Understanding the Cost of Painting a Wall
When budgeting for your painting project, it’s important to understand the average cost of painting a wall. On average, you should budget $1 to $2 per square foot for painting walls, including materials and labor. The cost can increase for accent walls, unique designs, or rooms with high ceilings which require ladders or scaffolding.
Choosing the Right Painting Tools
Having the right tools can significantly impact the efficiency and final result of your painting project. Here’s a list of tools you’ll need:
- Paint roller: A wide paint roller (12-inch or 18-inch) can help speed up the painting process.
- Angled paintbrush: A 2-inch angled paintbrush is perfect for painting corners and around trim.
- Paint tray: You’ll need this to hold your paint.
- Ladder: Depending on the height of your walls, a ladder may be necessary.
- Masking film or Painter’s Tape: These will protect areas you don’t want to paint.
- Extension pole: This tool can be a lifesaver for those hard-to-reach places.
Quality tools can make a difference in the final look of your paint job.
In the next section, we’ll guide you step-by-step through the process of painting your walls. Whether you’re a beginner or an experienced DIYer, we’ve got you covered!
Step 4: Painting Your Walls
Now that your room is set up and your walls are primed and ready, it’s time to get to the heart of wall house painting. This stage is where your room starts to come to life!
Painting Techniques for Beginners
As beginners, it’s important to remember to let the roller do the work. By starting near the edge of the wall and rolling the paint in a zigzag pattern, you ensure an even distribution of paint on the wall. This technique is known as the ‘W’ painting technique. Remember to roll the paint in several directions, especially on textured walls, to cover every nook and cranny.
Painting Walls in a “W” Shape
The ‘W’ painting technique involves starting in one corner and painting a large ‘W’ onto the wall, and then filling it in without lifting the roller. Begin by loading your paint roller with paint, removing any excess. Then, roll the paint onto the wall in a 3-by-3-foot “W” shape. Working your way back across that “W” without lifting the roller, fill in empty patches until that section of wall is fully covered. Continue this process, adding more paint to the roller as needed, until the entire wall is painted.
Applying Multiple Coats of Paint
Depending on the color and quality of your paint, you may need to apply more than one coat to get a professional finish. Make sure to allow adequate drying time between each coat, as specified by the paint manufacturer’s instructions. Applying multiple coats not only enhances the color but also increases the durability of your paint job.
Removing Painter’s Tape
Once you’ve painted your walls and are happy with the coverage and color, it’s time to remove the painter’s tape. Wait until the next day to remove the painter’s tape, pulling it straight back to cut the paint and create a sharp line. This process will give your freshly painted walls a professional-looking edge.
At Earthly Matters Contracting, Inc., we understand that wall house painting is an art that requires precision, patience, and expertise. We hope these steps help you achieve a paint job that not only looks great but also lasts long. If you need further guidance or prefer to have professionals handle your painting project, we’re here to help.
In the next section, we’ll cover the final step in the process: cleaning up and evaluating your work. So stay tuned!
Step 5: Cleaning Up and Evaluating Your Work
After you’ve successfully completed your wall house painting project, clean up properly and evaluate the quality of your work. This final step ensures your painting tools last longer and helps you identify if any touch-ups are needed.
Proper Cleaning of Brushes and Rollers
Cleaning your brushes and rollers immediately after use will extend their lifespan and ensure they’re ready for your next painting project. If you’ve used water-based paint, clean your tools with warm water and a bit of dishwashing liquid. For oil-based paint, you’ll need a paint thinner to clean your brushes and rollers. Once clean, reshape the brushes and let them dry horizontally to prevent damage to the bristles.

Sealing Remaining Paint in Cans
If you have leftover paint, ensure the can is sealed properly to keep the paint fresh for future use. Wipe clean the groove of the paint can before replacing the lid. To seal the can, place the lid on top and gently tap it with a hammer. Store the paint in a cool, dry place, away from extreme temperatures.
Evaluating the Quality of Your Paint Job
Now it’s time to evaluate the quality of your painting job. Look at the walls from different angles and in varying light conditions to check for any unevenness, missed spots, or drips. If you find any imperfections, wait until the paint is completely dry before doing any touch-ups. It’s common to spot minor issues after the first DIY paint job. Don’t be too hard on yourself; painting is a skill that improves over time.
When to Seek Help from a Professional
While DIY wall house painting can be a rewarding task, there are times when seeking professional help is the best option. If you’re not satisfied with the results, or the task proved to be too big or difficult, don’t hesitate to reach out to professional painters. At Earthly Matters Contracting, Inc., we pride ourselves on delivering top-quality painting services that will transform your home. Our team of skilled painters can handle any painting project, big or small, ensuring you achieve the look you desire with minimal stress.
In conclusion, cleaning up and evaluating your work is a crucial part of the wall house painting process. It helps maintain your painting tools, preserves leftover paint, and enables you to assess the quality of your work. Practice makes perfect when it comes to painting, and there’s no shame in seeking professional help when needed. Happy painting!
Conclusion
Recap of the 5 Simple Steps
In this guide on wall house painting, we’ve walked you through five simple steps to achieve a fresh and professional look for your home.
- Preparing Your Room for Painting: This involves clearing out furniture, inspecting and repairing wall imperfections, cleaning the walls, using painter’s tape to mask off trim, windows, and doors, and protecting your floors with drop cloths.
- Priming Your Walls: A crucial step that ensures the paint adheres well and provides a smoother finish. It includes choosing the right primer, applying it to the walls, and sanding for a smooth finish.
- Choosing the Right Paint and Tools: This step guides you on selecting the best paint for inside house walls, understanding the cost of painting a wall, and choosing the right painting tools.
- Painting Your Walls: Here, we covered painting techniques for beginners, painting walls in a “W” shape for even coverage, applying multiple coats of paint, and removing painter’s tape.
- Cleaning Up and Evaluating Your Work: The final step involves cleaning brushes, rollers, sealing remaining paint, and assessing the quality of your paint job.
Encouragement for DIY Wall House Painting
Embarking on a DIY wall house painting project can be a rewarding experience. It allows you to personalize your space while learning a new skill. With the right tools and techniques, you can create a professional-looking paint job that transforms your home. So, don’t shy away from picking up that paintbrush. Practice makes perfect!
Final Thoughts on Wall House Painting
Wall house painting is more than just a decorative effort; it’s about enhancing the aesthetic appeal of your home and protecting it from the elements. Whether you’re doing it yourself or hiring professionals like us at Earthly Matters Contracting, Inc., it’s crucial to follow the right steps and take the time to do it right.
We understand the challenges homeowners face when undertaking a painting project and are here to help. With a commitment to excellence, attention to detail, and superior customer service, we aim to exceed your expectations. A fresh coat of paint can breathe new life into your home. So, go ahead, start your wall house painting journey today!
Related Post
We are happy to give you a free estimate on your project.
Your Ultimate Guide to Fence Painting Companies in Metro Atlanta, GA
Find the best fence painter in Metro Atlanta, GA with our guide on costs, techniques, and local professionals!
Read More
A Beginner’s Guide to Painting Walls: Techniques and Tools
Learn essential techniques and tools for painting a painters wall effectively with our comprehensive beginner’s guide.
Read More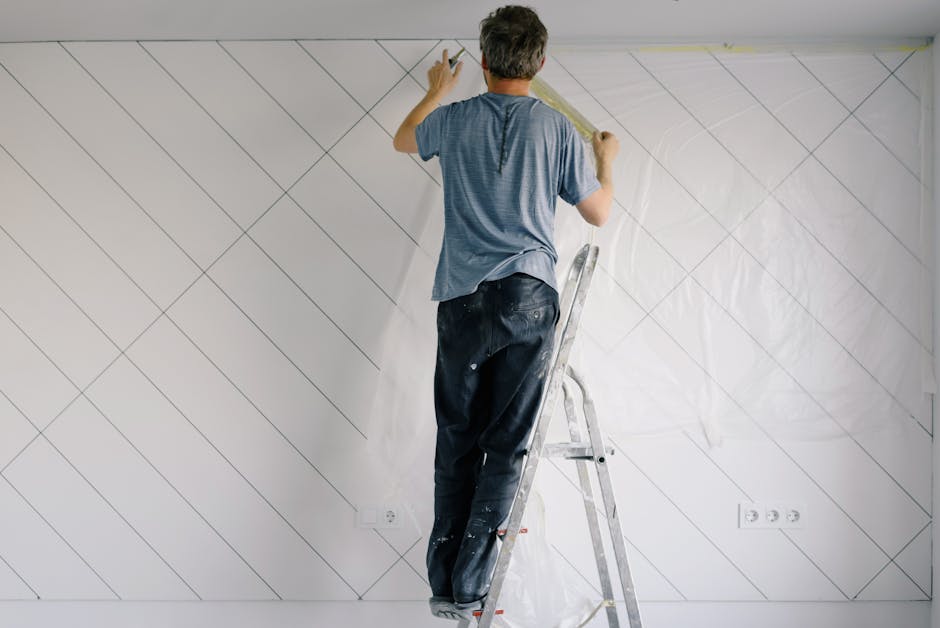
How to Prime Walls for Painting
Learn expert tips on repainting a room with our guide on choosing primers, applying them, and more!
Read More
How to Choose Affordable Painting Services Nearby
Discover top tips on choosing an affordable interior painter near you, evaluating costs, quality, and local options effectively.
Read More
Understanding the Cost of Painting a House in Alpharetta
Explore factors affecting the cost of painting a house in Alpharetta, from labor rates to paint types. Get expert tips and local contractor info!
Read More
Find Local Deck Painters: Your Guide to Exterior Deck Painting Services
Discover top exterior deck painters near me and master the art of deck painting for enhanced curb appeal and durability.
Read More
Cost to Paint Home – 2024 Cost Calculator (Customizable)
Discover essential insights on home paint cost with our comprehensive guide. Learn about DIY vs. professional costs, room-specific estimates, and more!
Read More
The Real Cost of Hiring Professional Painters: What to Expect
Discover the true professional painters cost, what influences prices, and benefits over DIY. Make informed choices for your next project!
Read More
How to Paint Your House Exterior Quickly and Easily
Discover the easiest way to paint outside of your house with our step-by-step guide on selecting tools, techniques, and safety tips.
Read More